From Cargo to Cozy: Painting Our Upstate NY Shipping Container Home
Embarking on a journey to transform a raw steel box into a warm, inviting retreat is no small feat, but it's a testament to vision, hard work, and the power of a fresh coat of paint. Our Upstate New York adventure began with purchasing land and acquiring a used shipping container, destined to become our weekend getaway. This summer, while the garden flourished, our attention was drawn back to the container, and the immediate goal became clear: make it livable, cozy, and ready for those crisp autumn weekends. This involved a crucial step, the heart of our current DIY project: **pm upstate adventure painting the interior of the shipping container**. The difference a clean, bright interior makes is truly astonishing, setting the stage for everything that comes next.
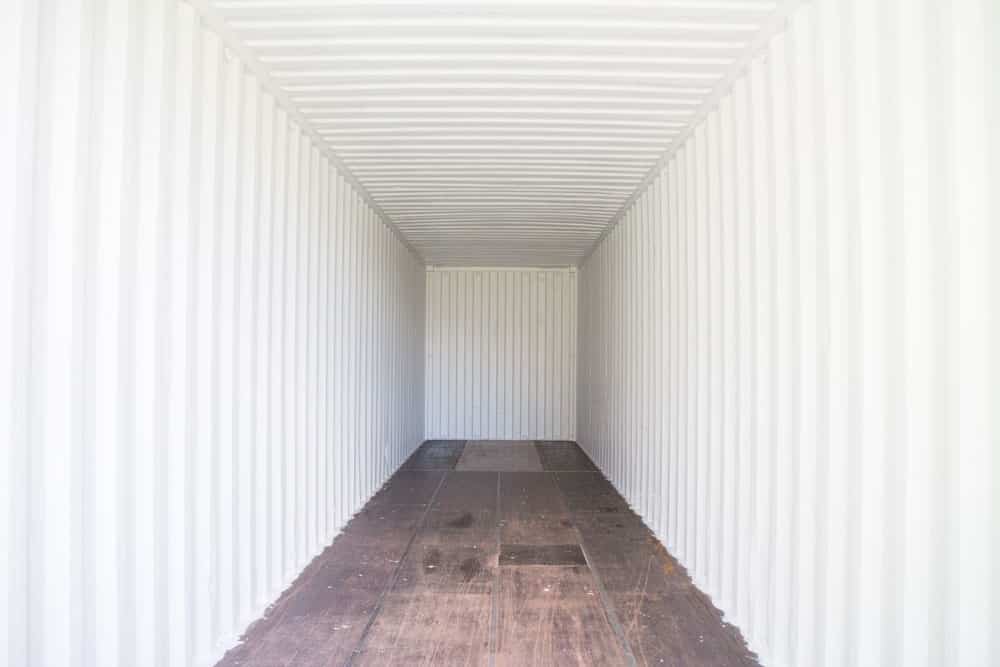
The Transformative Power of White: Our Upstate Container's Interior Makeover
Before the brushes hit the corrugated walls, our used shipping container interior told a story of its past life: scuffs, dirt, and marks from years of lugging cargo across oceans. It was anything but a cozy haven. We knew the initial step to transforming this industrial shell into a welcoming space had to be a thorough cleaning and a fresh coat of paint. Our choice? A brilliant white.
White paint, especially in smaller or unconventional spaces like a shipping container, is more than just a color; it's a design strategy. It maximizes the perception of space, reflecting light to make the interior feel larger and airier than it truly is. Moreover, it instantly conveys a sense of cleanliness and freshness, a stark contrast to the container's previous state. For us, it was about creating a blank canvas, a bright backdrop that would allow us to envision and eventually build out the various functional areas within. This simple aesthetic decision profoundly impacted the entire feel of the space, turning a grimy metal box into a foundation for our "cozy" dream.
Strategic Paint Choices: Why Exterior for Interior Walls?
When it came to selecting the right paint, we didn't just grab the cheapest interior white. Our choice was deliberate and informed by the unique nature of a steel shipping container. We opted for Valspar Duramax exterior paint, a decision that might seem counterintuitive for an interior space but proved to be incredibly pragmatic.
The primary reason for this unconventional choice lies in the inherent characteristics of an uninsulated shipping container. These metal boxes experience significant temperature fluctuations. In the heart of an Upstate New York winter, the interior can become freezing, while summer days can turn it into a sweltering oven. This constant and extreme shift in temperature, combined with potential external moisture, can lead to condensation and humidity build-up on the interior steel walls. Standard interior paint simply isn't designed to withstand such dynamic conditions.
Exterior paints, like the Valspar Duramax we used, are formulated with robust protective qualities. They are built to endure harsh weather, resist moisture, and flex with temperature changes, making them far more resilient against the kind of environment found inside a raw steel container. This specialized formulation helps prevent issues like peeling, blistering, and mildew, which could otherwise plague standard interior paint in such a setting. While this is a temporary solution before we install full insulation, it provides essential protection and durability, helping to seal and sanitize the interior surface effectively.
Our chosen paint also boasted a paint + primer in one formula, which typically reduces the need for multiple coats. However, due to the extensive marks and stains from the container's cargo-hauling past, we still found it necessary to apply two full coats to achieve complete, uniform coverage. For more insights on this specific choice, you can read our detailed breakdown on
Upstate Adventure: Painting a Shipping Container Interior with Exterior Paint.
Tackling the Task: Our DIY Painting Process & Tips
The actual process of painting the shipping container interior, while rewarding, was a significant undertaking. Here's a look at how we approached it and some tips for anyone considering a similar DIY project:
1.
Thorough Preparation is Key: Before any paint could touch the walls, extensive cleaning was crucial. Years of cargo transport had left the interior dirty and marked. We started with a strong degreaser and scrub brushes, ensuring all grime, dust, and loose debris were removed. This step is non-negotiable for proper paint adhesion and a lasting finish. Any rust spots were also treated and primed separately before the main painting began.
2.
Application - Two Coats for Perfection: Despite using a paint + primer in one, the container's heavily marked surfaces demanded two full coats. We applied the first coat, allowed ample drying time (as per manufacturer instructions), and then followed up with a second. This ensured all blemishes were fully covered, resulting in a smooth, uniform white finish across all four walls and the ceiling.
3.
The Ceiling Challenge: One of the most physically demanding aspects was painting the ceiling. Our container stands at 9'6" tall, requiring constant overhead work. We quickly learned that a sturdy ladder or, even better, a multi-position step stool, is indispensable. Matthew can certainly attest to the muscle ache that followed for a few days! For anyone painting a tall container ceiling, frequent breaks and a good stretching routine are highly recommended.
4.
Essential Tools and Safety: Beyond rollers and brushes, ensure you have:
*
Drop cloths: To protect the floor (even if it's currently just raw steel).
*
Painter's tape: For clean lines around door frames or future features.
*
Proper ventilation: Especially when working with exterior paints indoors. Open both ends of the container if possible, and wear a respirator mask.
*
Protective gear: Gloves, old clothes, and safety glasses are a must.
5.
"Cutting In" with Precision: For the edges, corners, and around the existing container doors, we used high-quality angled brushes to "cut in" carefully before rolling the larger flat surfaces. This technique ensures crisp lines and full coverage in areas where a roller can't reach.
Budgeting Brilliance & Future Horizons
Budget and time constraints are realities for many DIY projects, and our shipping container conversion is no exception. We meticulously tracked our expenses, learning valuable lessons along the way. For the entire interior, including the walls and ceiling (and inner faces of the doors), we used a total of four gallons of Valspar Duramax paint. Each gallon typically costs around $40, but by purchasing during a Valspar sale at Lowe's, we managed to save $30 overall, a small but significant victory for our budget-conscious project. This highlights the importance of keeping an eye out for sales and discounts on materials. To learn more about the costs involved and practical tips, explore our article on
DIY Shipping Container Interior Paint: Cost, Tips & What We Learned.
The decision to buy a used shipping container was also a financial one, offering substantial savings compared to a new unit, even if it meant more elbow grease for tasks like cleaning and painting. This "baby steps" approach to our big dreams allows us to make progress without breaking the bank, transforming the container into a functional and pretty space for weekend getaways, even if it's not yet fully insulated or partitioned.
With the interior paint now gleaming white, the immediate visual transformation is profound. It feels less like a cargo container and more like a blank slate, ready for its next evolutionary stages. Our upcoming projects include framing out walls for a bathroom area, installing flooring, and fitting doors, each bringing us closer to our vision of a truly cozy Upstate NY retreat.
Conclusion
The journey of converting a used shipping container into a comfortable Upstate New York home is a testament to perseverance and creativity. Our **pm upstate adventure painting the interior of the shipping container** marked a pivotal moment in this transformation. What began as a dirty, industrial shell has been reborn with a fresh, bright white interior, breathing new life into the space and making it feel instantly more inviting. This vital first step, though physically demanding, has laid the essential groundwork for our future plans, from insulation to plumbing. With each project, big or small, we're steadily moving "from cargo to cozy," creating the perfect weekend getaway where dreams take shape, one carefully painted wall at a time.